I was taken on the beach one evening, far out as the tide was low, & was amazed that this little fella was found for me; only had my mobile phone but the starfish texture has turned out surprisingly clear & inspired me to get closer &* capture more textures of nature.
* Note: an error has occurred & all my '&' have been replaced with html. I copied & pasted into Word & replaced all 235, but when pasted back into my Blog, all images had gone. Apologies, but due to prioritising time, these will not be replaced in time for submission.
TEXTURES
I have an Album on my social network Facebook with photographs I have taken that have inspired me, or can use as reference, or edit in Photoshop to create textures in Maya: Images of Textures on my FB, & also please see images I post from others on my Pinterest for inspiration & research.
I had a tutorial at University, & one of the things we covered was the role of Texture Artist as a potential career option for me.
I had a lesson in Maya, & we created a rust texture from an image from a boat I had taken at sea. I took notes, & learnt a lot of new techniques on Maya, & reminded myself on others I have already covered, but with not using the software, have easily forgotten.
My own photograph of rust on a fishing vessel, taken at sea with my Nokia mobile camera
Image edited in Photoshop: cropped, cloned, wrapped; saved as .png file
Cropped a copy of the rusted metal from the image to form our piece of rust
Then using the Wrap tool, created a square that encapsulated 4 copies of the image
To eliminate the light & dark edges of the image (top & bottom where the light hit) that were showing, giving it a rather unrealistic look, it was cloned; copying areas to cover other areas until a square image of rust appeared with no divides; looked like one image.
Opened in Maya
Created a sphere
Altered the light & shine/highlight
Amended the colour & rendered a sphere of rust texture
This image was a tutorial/test image, thus, not as perfectly clean as could be due to time constraints.
.png file opened in Maya, a sphere created & the texture edited & rendered, & colours & highlights changed
A sphere was chosen to display my textures, & a cube/square could also be used but I like the display as a sphere, it is less harsh for what I am trying to portray. Although reading this tutorial has given me the idea of experimenting by adding my textures to a golf ball/sphere with a lot of flat surfaces, however due to my degree deadline timescale, & successfully completing all my projects on time, this is a project for a later date.
Concentrating on other parts of my project, when I returned to use Maya, I was quite shocked at how I could forget so much!
I have realised I will work more productively if I focus on taking & selecting my photographs of textures, to then create up to at least 20 texture image files in Photoshop. Once completed & selected, I can then sit & focus on learning Maya, whilst using these files to create my spheres of textures, & learn! Hopefully, this way I will be able to work my way around Maya, & gain a deeper understanding of this software package first-hand. (I have been told by fellow creatives to use Cinema 4D &/or 3d Max, but my fellow games colleagues & University have recommended Maya! I realise that having knowledge of Maya, will benefit me in my career in the gaming industry; it is a large & complex piece of software, & so do not expect to learn it overnight.)
I have been looking at the Help in the software, & also on the Autodesk website, & have looked at other online tutorials, but to help keep it consistent at this moment, I will concentrate on the Autodesk online help.
A helpsheet on NURBS & Assigning a New Material; this is not a step-step guide to what I am doing, but I can use some of the instruction & transfer to my own task of creating textures on a sphere.
I found this on a search for rendering textures onto spheres on Autodesk Maya:
"File textures are bitmaps scanned from photographs, taken with a digital camera, or painted in a 2D or 3D paint package that you bring into Maya to use as a bitmap. File textures filter better than most procedural textures and can result in better image quality.
NoteYou can render an entire branch of a shading network to use the illumination, shadow, shading, and textures as a file texture (texture map) for the following reasons:
To reduce rendering time of particularly complex networks or if mental ray's high-profile global illumination features are involved.
To obtain lighting effects that would be difficult to achieve in other ways.
For more information see Baking illumination and color. Considerations for creating file textures Animated file textures To use a sequence of image files to create an animated file texture, the file extensions must be separated from the basename and, or the extension by periods. For examples, see Image Name. NoteUsing “.” to delineate animated file texture names may cause the wrong frame to be used for texture mapping. Maya parsable, animated file textures should be of the form XXX.ext.###, where XXX is the filename, ext is an optional file extension (.sgi, .tif, .iff, and so on), and ### is the frame number. It is also possible to use file textures of the form XXX.###.ext. We do not support XXX###.ext (without the “.” between XXX and ###), nor XXX.YYY.###.ext (but XXX_YYY.###.ext is fine). File textures for hardware rendering In general, when rendering with file textures, take into consideration how much space the texture takes up in screen space. Larger textures (in one or both dimensions) use a lot of memory and take longer to render because the hardware renderer must spend more time reducing their size. Try to keep textures as small as possible when rendering. This substantially decreases rendering time and memory usage and may result in better quality (fewer aliasing problems and texture crawling). NoteOn Apple®Mac OS®X, file textures larger than 1K are not supported. Tileable file texture images Like any other texture, you map a file texture to an attribute of a material (shader). You can map file textures as a tileable (repeating) image where the opposing edges of the texture line up. Procedural textures are tileable by default, but if you want to tile (repeat) file textures, you must make sure edges match properly to prevent seams. To make sure edges match properly, you can use an image editing package to offset the image, then touch up light or dark areas in the offset tile. A tileable bitmap image is one that can be broken down into smaller pieces. Tileable images load faster and easier by the renderer, saving valuable rendering time. For more information on how to reduce the load on RAM during render time by converting your textures to Block Ordered Textures (tiles), see Cache texture tiles using BOT (block ordered texture) in the Rendering guide. Square vs. non-square bitmap images You want your texture to fit your model perfectly, as though the texture has been painted on. You could measure the surface to which the texture is attached. However, because Maya is more efficient if it scales any non-square texture into a square texture, using a square image to begin with is recommended. If the object you are texturing is not square, for example, a lamp pole, place your texture in a black square."
Fish Fin
I took photographs of carp fish at a friend's fishery; fins, tails & scales, to use as textures & mermaid tail. If time permitted, I would spend more time on a better lit (& non-wet) day, & being new to my camera, was not very familiar with all the settings; having a precious fish flapping in front of me also ensured I rushed at getting my images - practice would make perfection more attainable next time.
I selected the best image & edited in Photoshop
My photograph of a carp after some editing in Photoshop.
Using the 'magnetic & polygonal tools' I selected the outline of the fish & cut/cropped it & deleted the background to be left with the fish. I then edited the levels, colours, saturation etc.
After I had used the lasso tool, I discovered the pen tool with bezier, which helps get a far cleaner outline edge; this is another tool I am learning.
From this image, I selected a square of the fin, copied & pasted into a new page & saved as a .png, to then edit to create a texture in Maya.
The square cropped initial image
Image 'wrapped' in Photoshop using the 'filter' tool
The image creates divides & this needs edited to create a singular & cleaner image.
The final image, post editing; using the 'clone' & 'selection' tool to copy areas from one part of the image & cover other parts to eliminate the 'hard-edges'.
MAYA
I can see a seamline; amended in Photoshop
I am showing the 'seam' here, this would need amended in Photoshop using the 'offset' tool again until the seamline had gone.
My photograph of a carp fin created into a texture
Carp Scales
I created a texture using Photoshop & then Maya. I used my photograph of the carp, opened it in Photoshop, cropped a square of 512x512 (remembering to take note of this measurement divided by 2 for the following stage), & pasted into a new blank page; saving as a .png. Using the 'Offset' tool, & 'wrapping' the image, it created a square image. This showed edges/divide through the centre; horizontal & vertical & to fix this, I used the 'clone' tool. Once the image looked like 1 image, rather than 4, I saved & opened Maya.
Cropped image pasted into Photoshop
Image wrapped in Photoshop
Cloning other areas of the image to merge the texture into 1 image
Cloning other areas of the image to merge the texture into 1 image
I learnt that I need to take it a lot slower & be more aware of where the scales meet, & matching these with parts copied from other parts of the image; amending the attributes/size of the clone tool
Due to timescale, this image was rushed to allow me to be able to have an update tutorial in Maya, to create textures, therefore, this texture image is not a very good example, but is part of my learning process
I re-edited the carp scales image, & although I feel it could be sharper, the scales lay & overlap far more realistic than the previous attempt.
Then took it into MAYA
Created a Sphere
Added the texture to the sphere, & amended the texture using 'bump' rendering, & edited the colours to show the reflected lighting on this, trying different colours & sizes of bump & direction of light, to illustrate a 3d image of texture.
I tried again:
Creating a carp scale sphere in Maya; I was not happy as I could see a join
Editing the shading but there is a definite seamline that needs rectified
I edited the 'flat' shading
Showing the 'flat' shading with the carp scale texture
...but much better with a smooth shading, albeit I don't like the join line
Sphere rotated, I like the strong colours, but the texture lacks depth
Edited 'bump' to create a more ingrained texture
Using the colour in the image, I edited the Common Material Attributes but it was far too orange-toned
I experimented further using the Special Effects
Carp scale texture on a sphere created in Maya; I need to investigate why the colour loss, the Rendering settings need amending.
Carp scale texture on a sphere created in Maya; extreme depth of texture here!
Starfish
Although this mobile-phone image has colour & texture, the starfish is so small that when I copied a square to create a 'texture' image, the texture was lost & very blurred.
My photograph taken with my mobile phone; my camera would have taken a far higher resolution image & in 'macro, for a close-up shot.
I cropped the starfish, & created a square image
...& then, using the 'offset' tool, I wrapped the image.
I also tried another area, cropped & wrapped it in Photoshop, but could then see that my 1st attempt was a clearer image.
Using the 'clone' tool, I copied other areas of the image & eliminated the hard edges to create 1 image.
Starfish Texture
I edited the image using the 'levels' & 'contrast' tool & used the 'sharpen' filter.
Starfish Texture from my photograph; I want to edit the lighting in this image
Starfish smooth from my photograph. Although it is showing the centre, I like this effect & want to explore further.
Starfish Texture with bump to enhance the texture from my photograph. Although it is showing the centre, I like this effect & want to explore further.
My photograph of a jellyfish edited in Photoshop & Maya to create a texture: darker & a Blinn hypershade
My photograph of a jellyfish edited in Photoshop & Maya to create a texture; Anisotropic hypershade
Jellyfish
I may not be in the ocean to take photographs of jellyfish, but I do see them on the beach when they have been abandoned by the sea, after the waves have kissed the shore, & have done research online some more:
My photograph, taken with a mobile phone, of a Lion's Mane Jellyfish
Added the keys to show the enormous size!
...& then got a little closer for more texture & detail.
My onlineresearch found a much bigger Lion's Mane Jellyfish!
My photograph
I changed the setting to 'negative' to experiment in different colours, however the detail showed more on the normal setting, but I would like to develop this & experiment further; I can see the colours becoming more magical & jewel-like.
Blue Jellyfish
I found a large jellyfish on the beach & took a photograph with my Nokia mobile phone. Setting it to 'negative', I got old colours to 'pop' out of the image....gold of the sea!
Image after using 'offset' tool
Image whilst I amusing the 'clone' tool, to eliminate the centre edge of the images
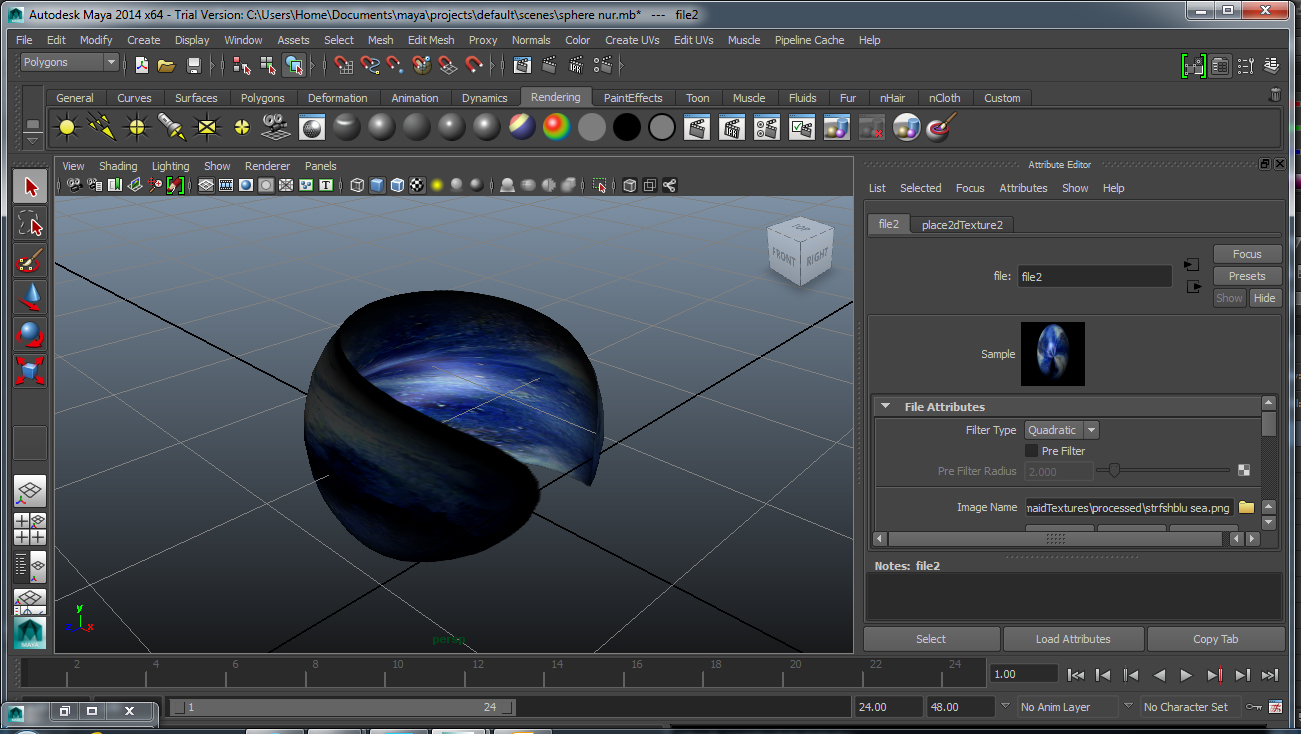
My photograph of a blue jellyfish now edited & 'wrapped' in Photoshop to create a texture .png file, ready to be taken into Maya, & rendered onto a sphere for my textile presentations.
Rotated to give a different view
& I found a heart!
My photograph of the Blue Jellyfish
Nude Jellyfish
This texture was quite experimental. I originally commenced with the idea of creating a texture for jellyfish, but after trying different settings in Photoshop, created an image where I liked the imagery & thus decided not to 'clone'. I was quite excited to render in Maya, & see how it appeared on a sphere/cube; if it didn't work, then I knew it could be used for other things.
Blue Jellyfish
Base image
Edited in Photoshop using the 'offset' tool again, I experimented & used another option: 'high pass' to create something totally different in aesthetics, than I had set-out to do, but I loved the 'nude-fragile' transparent effect.
I wrapped the image using the 'offset' tool, & using the 'clone' tool eliminated the borders within the image (created when it is wrapped), & copied other areas to create a smooth transition between the 'wrapped' image edges.
I then adjusted the 'levels' to create more depth & texture
I added a 'sharpen' filter, but realised it was not needed, & then gradually reduced the filter effect but thought it was better without.
Something new for me...
& which I would like to take further on this, & a selection of my other, images.
Screen Shots of Editing in Maya
Sphere of Jellyfish; looks like a planet, or metal, & so I will edit more in Maya.
Under-water
My photograph taken with a mobile phone; the wash of tones of the jellyfish gives me the image of movement, & a softness - almost sheer fabric-like.
I edited in Photoshop, using the selection tool to copy areas & paste into new layers & then edit using the 'levels', 'contrast' tools etc & editing the colours & saturation to enhance the blue & strengthen the depth & texture of the jellyfish.
I increased the 'vibrance & saturation' of the jellyfish
Erasing
I overlayed the image but wasn't happy with the tones in the distance or the sand, & so erased parts to reveal the underneath image, which had a more subtle tone, thus not taking away from the impact of the jellyfish.
I tried various 'blend 'layers' to see if this would enhance the colour & tones
Increasing the canvas size
One side of the jellyfish had a border of sand & the other side did not; to balance the image, I increased the 'canvas' size, setting the 'anchor' point from centre-left.
This created a white border down the right hand side, & so I then used the 'clone' tool, with a 'soft edge' to soften the join, & copied areas onto the right side & create a full image.
Underwater Background Image
I edited my photograph on Photoshop of a jellyfish with far-distant sea on the horizon. I cropped, then used the 'offset' tool as I had been to create my 'texture' images, then I experimented to take it further, & used the 'colour-balance', 'contrast', 'levels', & 'saturation' options to edit the colour further. I created a lot of variations; both soft & subtle, & dark & discovered the appearance of a skull
Rotating the image gave the effect of a world, which I liked
Assigning the texture file to the 'bump' to enhance the texture created an error
The error highlighted as I edited the colours
Showing the error, although I could not find out how this had happened
I tried adding the texture to a new sphere but although it looks interesting & I would like to investigate, it is not what my objective is today.
Enhanced the 'bump' settings to create more depth in the texture
My photograph of a jellyfish edited in Photoshop then Maya: dark but giving the appearance of a world entering night.
My photograph of a jellyfish edited in Photoshop then Maya to create a texture: lighter, looks like the centre of a world.
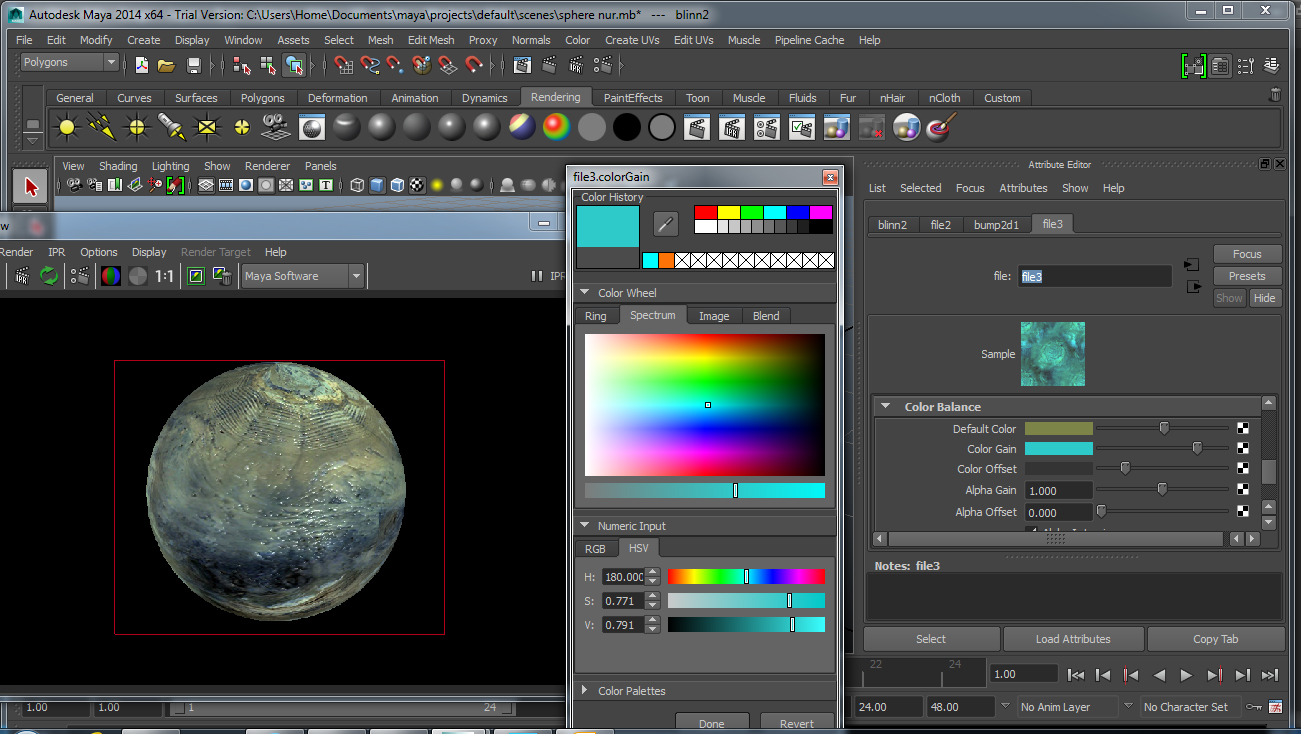
My photograph of a jellyfish edited in Photoshop then Maya to create a texture; texture enhanced, & now looks like the cover of planet! Hence why I have shown the centre-point on this image....
Texture from my photograph of a jellyfish, that appeared like the ocean
Sea Waves & Spray
Original image of me stood in the sea: moving water
Edited in Photoshop by amending the 'levels' & 'colour balance' & 'vibrance'
I cropped & wrapped the blue section, but with the image being a small image, it does not have the clarity I want. I will still try & render it to a sphere in Maya, to then see how it looks.
The cropped image prior to using the 'offset' tool in Photoshop, where I edit it to meld the dark & light tones
As above, a small image fails to create the sharpness but this may still give the impression of dirty water when I render in Maya.
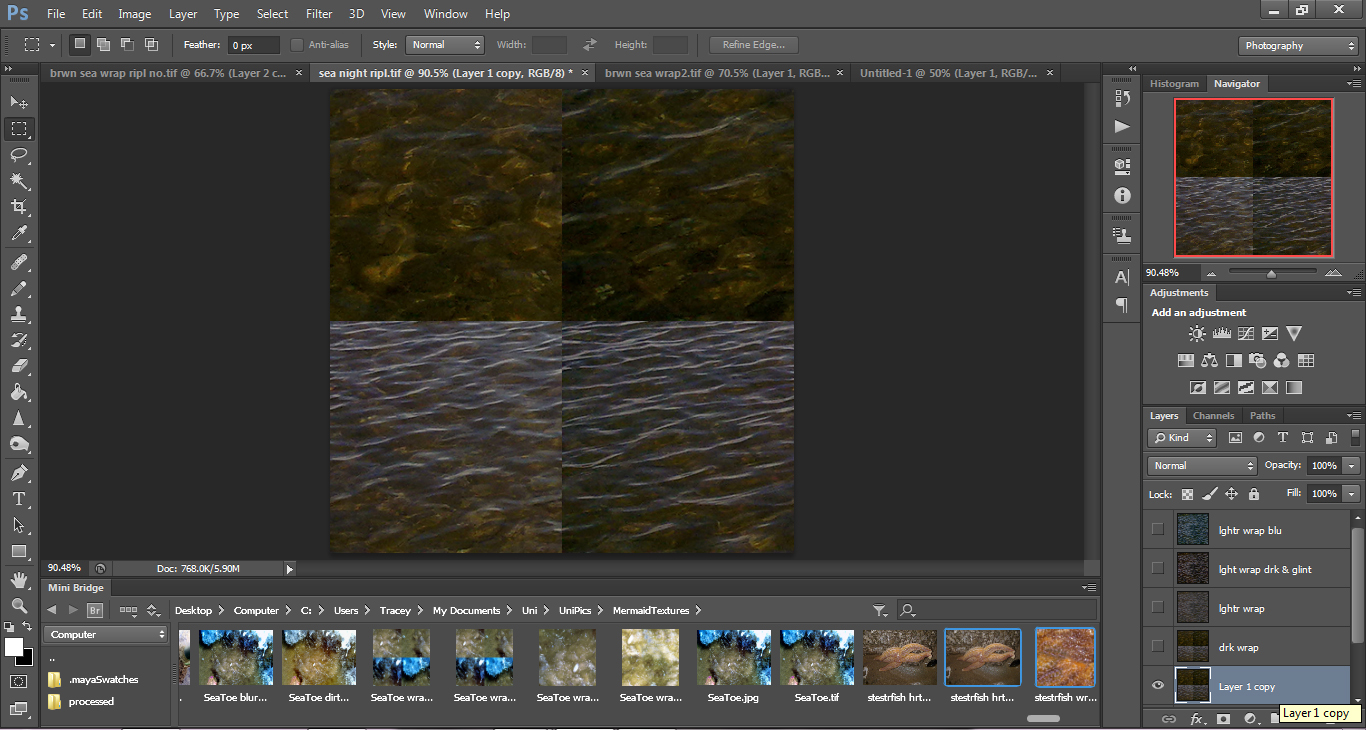
Sea Ripples
Cropped section pasted into a square
Image is 'wrapped' using the 'offset' tool; I can see straight away that the image shading/textures looks like 2 different sea photographs. I decided to crate 2 images from this, by using the 'clone' tool to create a lighter & a darker texture image.
The lighter 'cloned' texture image
The darker 'cloned' texture image
Shallow Rippling water
Deep, night, rippling water
Underwater plants & rocks
Sand to Ocean Waves
Original image, taken with my Nokia I had for a little while; the colours were very pale & subdued.
I highlighted the colours & definition etc, using the 'levels' & 'saturation' tool etc in Photoshop to enhance the sand, sea, & sky respectively.
Editing in Photoshop
I experimented further, trying various editing tools to darken & lighten sections of the image; I selected sections, copied then pasted into new layers, & edited individually to view these in various scenarios - adding more colour, lowering colour saturation, upping contrast, darkening the sky etc until I created an image where the colour was more dramatic, but imbued a surreal, slightly colour-popping landscape. A square selection of the sand was then selected, & pasted into a new page.
Section cropped & pasted into a new page, & then edited slightly to lighten, & resized to 512x512 to then edit to wrap the image, preparing to take into Maya
The image is wrapped in Photoshop using the 'offset' tool
Using the 'clone' tool, & varying the brushes' size & tip, I 'cloned' areas to create whole image; I was far happier with this outcome than previous attempts (I tried quite a few variations), & then....
experimented to see what happened if I created another 'wrap' using the 'offset' tool again; although it is very similar to the original, it is an improved image, cleaner & less busy.
...& have since been shown a tutorial, where the instructor uses the 'offset' tool more than once, to ensure no seam-lines, see below:
From this...
...to this sand ripple texture....&
...this sand ripple texture, with 1 subtle footprint. I am looking forward to seeing how it works in Maya, when I render to a sphere for my textures.
My photograph of sand ripples created into a texture in Photoshop & Maya
My photograph of sand ripples created into a texture in Photoshop & Maya
Experimenting by trying the sand on a cube
Editing
Experimenting by trying the sand on a cube & adding a 'bump' to create texture
My photograph of sand ripples edited in Photoshop & Maya & the texture presented on a cube
I have more sand images I have prepared in Photoshop, ready to edit in Maya & create texture files, & other images.
Moon
I have randomly tried, & yet substantially failed, to capture the magic of the moon in a photograph for some years, usually whilst stood on a beach or driving at night - obviously I stopped the car or wasn't actually the one at the wheel driving! Plus with my lack of knowledge & a digital camera from a previous era of technology, or a mere mobile phone, the images were not worth sharing, never mind saving to use another day. This year however, I have a new camera & another tool to grasp the technicalities of, whilst also developing my minimal knowledge of photography:
A displayed a moon image on Facebook, & one of my photographer friends gave me some advice; "Check if your camera has a metering mode in the menu Tracey. Pop it into spot-metering, and then get the moon bang in the middle of the shot, that should set the correct exposure for you then "I searched online for 'metering Samsung WB250F', & looked at the camera menu & found the information.
My unedited shot of the moon
Shot through my bedroom-roof window, using my Samsung WB250F camera on a mini-tripod, with a fast shutter & a small aperture; these are the settings I found online when looking at how best to photograph the moon, & other friends interested in photography also offered the same advice when I mentioned on Facebook that I was trying to shoot the moon.
I tried a slightly different setting, using 'Center-Weighted' instead, but the clarity & colour lessened.
A friend asked to take me out to shoot the moon but as I couldn't, & mine did not turn out as well from my roof window, he sent me 1 of his photographs; rather highlights the lack of surface texture on mine!
In the process of editing; I experimented by changing the levels, using the 'auto' tool to amend the colour/contrast/tone etc, on this image I preferred to go with the 'manual' option & change the settings myself. I have sharpened it & then lessened the opacity filter & changed the mode to 'Linear Dodge'; after trying some others this gave a more sharpened texture yet maintained the clarity of the moon's surface.
Applying the 'offset' tool, using half the size of the original
The moon is wrapped using the 'offset' tool
The finished texture; I am not happy with this texture as it does not portray a texture of a moon, with the craters & lakes etc, however I realise that my image I shot of the moon does not show the moon's surface as clear as a photographer could take (with a far superior camera), & I do not have a telescope; it is a long way off after all!
I also edited the original image with a smaller 'crop' & this has a developed into a variation of the above, & does seem to have a sharper texture, however I am still not satisfied that the image will portray a texture to reveal the moon's surface.
I used a smaller 'crop' from the original image...
...& then used the 'offset' tool to 'wrap' the cropped image
Stonemason - Sandstone Wall
Driving past this wall today, I remembered it being pointed out to me by the man who built it some years earlier; back then I took a quick photograph with my phone but today I had my camera. However, I was parked at the lights & felt I would be invading on the owners privacy to park up & stroll along taking photographs! The lights were in my favour; on RED, & so I swiftly pulled my camera out of my big bag that was sat on the passenger seat, & safely snapped a few shots, put the camera back, & watched the lights turn from red to amber to green....I got my shot!
Original image - lack of colour
Image cropped in Photoshop: levels, colours, vibrancy, saturation, contrast, etc edited, creating a stronger image of the sandstone, although the greenery is too strong in colour, detracting from the sandstone wall.
I selected the greenery, with a small feather-edge to ensure a softer edge to the selection, & copied onto another layer. Then I reduced the saturation, vibrancy, & amended the contrast/brightness, & edited the greens & blues.
Before editing
Post edit: the wall now stands out, & the greenery above is diluted to allow this.
Cropped section of wall pre-edit
Section of wall post-edit in Photoshop - I amended using the 'levels' tool, to deepen & highlight the beauty of the stones, textures, structure & colouring.
3rd wall image:
Pre-edit
I decided to edit a 3rd image to see if I could enhance the texture better than the previous.
Editing; looking better!
In Photoshop, I duplicated the background layer to work on a copy, zoomed in & edited the stonework: this image shows me using the 'levels' settings tool.
Cropped a piece from the above image, & pasted into a new 512x512 page
I wasn't quite happy with the shades of colour, & so edited them using the 'colour balance' tool, & 'vibrance' tool; see above. Although my laptop screen is not calibrated, & therefore not a true representation of colour, it does appear a more suited colour for the texture; less blue & not too red.
Using the 'offset' tool, I 'wrapped' the wall image & then proceeded to use the 'clone' tool to eliminate the edges, & create an overall single image; this is now making me wonder why I am 'wrapping' the image in Photoshop prior to taking into Maya before I render onto a sphere to display my textures.
In Photoshop, I used the 'clone stamp' & 'polygonal lasso' tools to copy areas of the image to cover joins & breaks in the original 'wrapped' image, & used the 'eraser' to clean up copied/pasted edges.
I saved it as a .png file, the most suited to take over to Maya, & used the 'sharpen' tool to sharpen some areas.
Final edit of the texture .png image: Sandstone Wall
This will be taken into Maya & rendered to a sphere.
Editing my sandstone image onto sphere in Maya
Rotated & adding a deeper texture using bump
Editing in Maya
Rendered in Maya; colour too pale
Rotated to create a central point & lighting adjusted; although not perfect as a texture file, I like the image & effect it creates.
Rotated & texture deepened; as above, I like the effect, & is something I want to take further & use elsewhere
Texture deepened & 'Phong E Material' added
I was happy with my image & edit in Photoshop of my sandstone wall, & was not sure how it would turn out in Maya, but am very pleased with the result, & can imagine this texture being used a variety of games, from fun & young (colour it pink!), to a war zone.
Other Texture Artists I Have Researched
I have chosen a sphere to display my textures on, & have seen other artists do the same, however I found a texture artist who has created a range of textures on cubes:
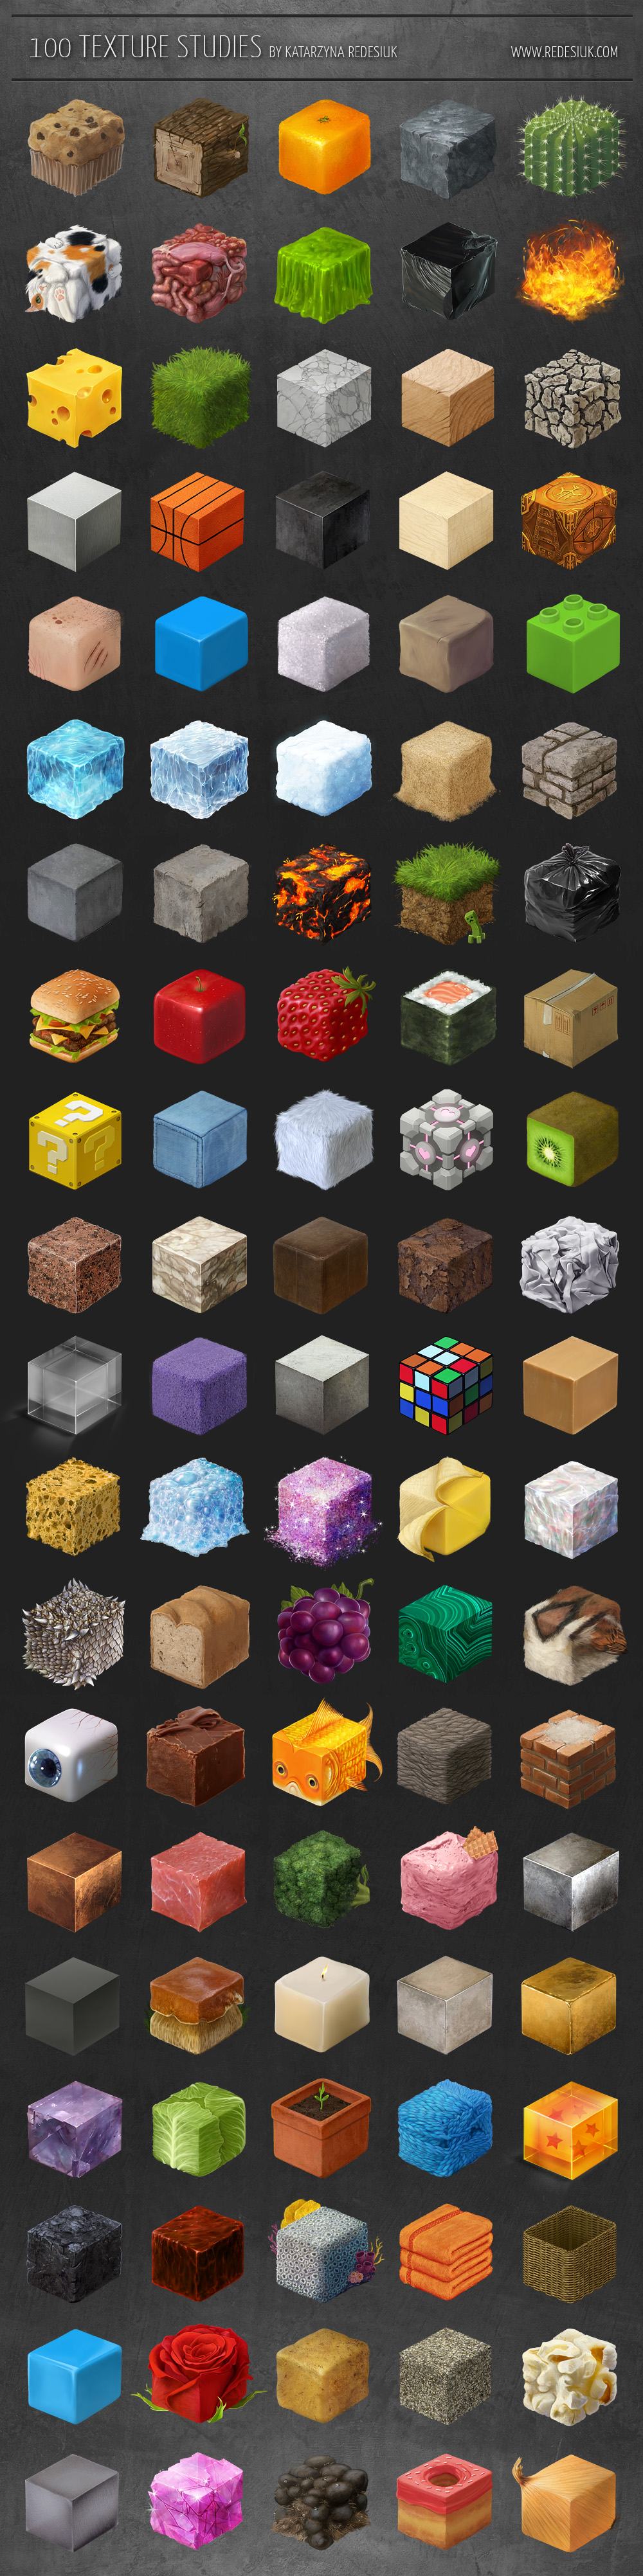
This artist: Katarzyna Redesiuk set themselves a challenge to create 100 textures on cubes, & although I generate my own textures from my photographs, to see other artist's artwork even when hand/digital-drawn, & how they create & present their textures, helps create an open-view & awareness of what is on the market, & of course ensures I remain unique & original:
Tanathe on DeviantArt
I have kept the image 'large' on purpose, for you to appreciate the textures.
"Done and done!It took a while but I'm finally done with the 100 texture studies challenge and I'm really happy about it. Usually it's done with spheres but I figured out it'd be more difficult and challenging if done on cubes.... and it was. Some of those were tiny nightmares to paint. All of them were made with brushes from my lazy brush set."
I have developed & experimented, & allowed myself to wander a tad whilst creating my textures, & have a real yearning to take it further, & try different things. Due to time scales this has not been possible. Reading this article, after I was attracted by the splash of colours & liquid, highlighted to me why; to create something more....
Fabian Oefner is a probing artist from Switzerland. His work is part science, part art. His newest collection of images is a continuation of his research of controlling paint with unusual, but natural forces. In the previous Black Hole series, centrifugal force shaped the paint into colorful looking swirls. This time, air pressure was used to create what he calls “liquid jewels”, hence the name of the series. Liquid Jewel is an interesting experiment that uses balloons covered in acrylic paint and air pressure to make distinctive shapes and color combinations.
Sample snippets of some of the advice I have been given when looking for help from fellow creatives that I know.....those with expertise far beyond my knowledge!
By tileable it means that your image repeats in both x and y values without any visible seams (That's not to say you won't have a seam from the wrapping on you object) but that the texture can be smaller and more detailed over and over on the surface without showing the joins between each tile of texture (You are starting to do that with putting multiple images into one texture and blending the seams but you are still going to see the edges of that texture if you scale it down)
In the attribute editor on the right hand side of the screen you should now see your texture. In there you should see the attributes and the top one should be 'color'.... to the right hand side of this the should be a little checkerbox. Click on that and that should open the 'create texture node' window and open a list of textures you can apply. Click on 'File'. Now in the attribute editor on the right you should see a blank box that has a folder icon next to it. Click on the folder and in the following window find your texture (wherever it is on you machine).
You wont see your texture on the sphere until you click the texture icon (a chequered ball directly above the viewport you are working in) and then click on 'shading' in the viewport menu just above that and go down to 'hardware texturing' and turn that on.
You need to go to hypershade then add new material. Probably Blinn is your best bet and will give you a smooth base. then double click on your new texture and on the rightyou will have more options go to add texture and then add file, then upload your png to the material and middle mouse drag onto your model where needed. hope this helped
scroll down to MAP into Image Name - find file -...... dble clik blinn > scroll down to attributes Bump rendering > OR click on black sqr opened in hypershade > image name attributes > select object - rght click Blinn1 - assign object &...
go into render settings in maya and change the render from maya software to mental ray you might have better results on the bump map


No comments:
Post a Comment